i18n the Easy Way: React, Vite, and JSON Locale Files
-(1).png&w=3840&q=75)
Adding Multi-Language Support to React + Vite with i18next
Adding a multi-language option to your React application has never been easier. Using i18next makes it simple, and when combined with the speed of Vite - you will be up and running within minutes! In this blog we will go through how to add internationalization (i18n) to a Vite powered React App, using external JSON locale files and react-i18next.
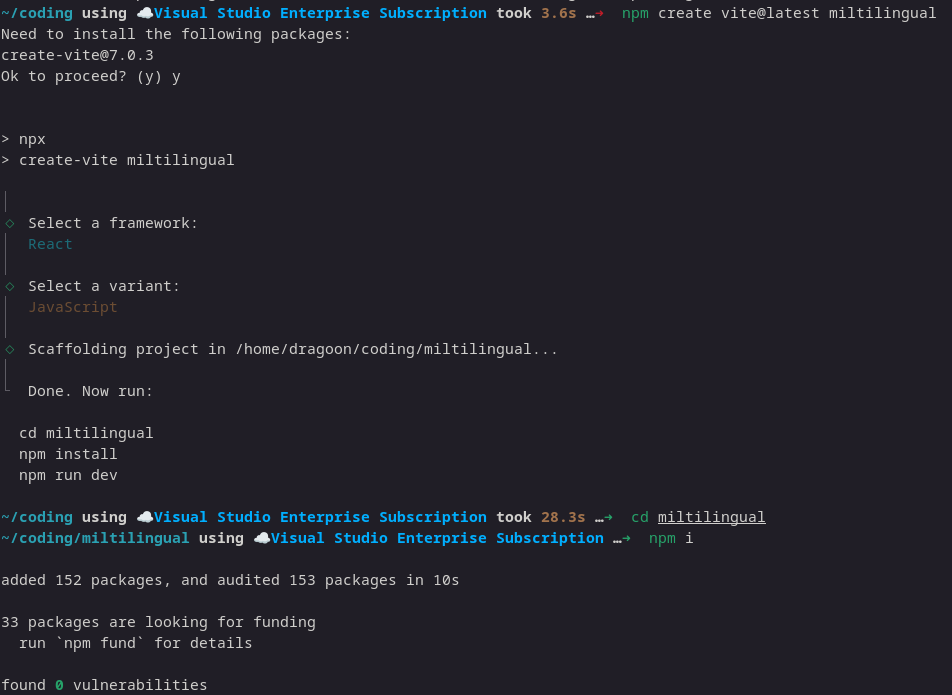
Step 1: Create a new React + Vite project.
npm create vite@latest my-i18n-app -- --template react
cd my-i18n-app
npm install
Output
Step 2: Install Required Packages
We are going to need 3 main packages:
- i18next: the core i18n engine
- react-i18next: react bindings for i18next
- i18next-browser-languagedetector: detect user's browser language
- i18next-http-backend: to load translations from external JSON files
npm install i18next react-i18next i18next-browser-languagedetector i18next-http-backend
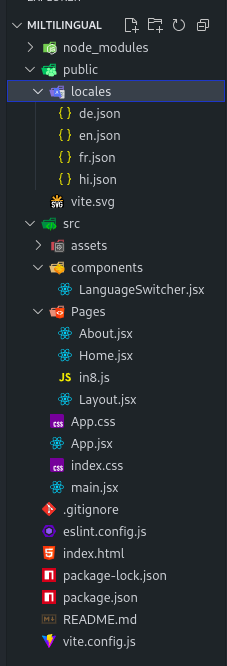
Step 3: Project Structure Setup
Create a locales folder inside the public directory:
public/
└── locales/
    ├── en.json
    ├── hi.json
    ├── de.json
    └── fr.json
Sample en.json
{
    "home": {
        "title": "Home",
        "description": "Welcome to the home page"
    },
    "about": {
        "title": "About Us",
        "description": "Learn more about us on this page"
    },
    "common": {
        "language": "Language",
        "switch": "Switch"
    }
}
Sample de.json
{
    "home": {
        "title": "Willkommen auf unserer Website",
        "description": "Dies ist die Startseite unserer mehrsprachigen Website."
    },
    "about": {
        "title": "Über uns",
        "description": "Hier erfahren Sie mehr über uns."
    },
    "common": {
        "language": "Sprache",
        "switch": "Wechseln"
    }
}
Sample hi.json
{
    "home": {
        "title": "मुखपृष्ठ",
        "description": "मुखपृष्ठ पर आपका स्वागत है"
    },
    "about": {
        "title": "हमारे बारे में",
        "description": "इस पृष्ठ पर हमारे बारे में अधिक जानें"
    },
    "common": {
        "language": "भाषा",
        "switch": "स्विच करें"
    }
}
Sample fr.json
{
    "home": {
        "welcome": "Bienvenue",
        "description": "Ceci est une démo"
    },
    "about": {
        "title": "À propos de nous",
        "description": "En savoir plus sur nous sur cette page"
    },
    "common": {
        "language": "Langue",
        "switch": "Changer"
    }
}
Step 4: Configure i18n
Create a new file src/i18n.js and configure i18next:
import i18n from "i18next";
import { initReactI18next } from "react-i18next";
import LanguageDetector from "i18next-browser-languagedetector";
import httpBackend from "i18next-http-backend";

i18n
  .use(httpBackend)
  .use(LanguageDetector) // detects browser language
  .use(initReactI18next)
  .init({
    fallbackLng: "en",  //fallback language
    debug: true,

    interpolation: {
      escapeValue: false,
    },
    backend: {
      loadPath: `/locales/{{lng}}.json`, //path of the languages
    },
  });

export default i18n;
Step 5: Initialize i18n in App.jsx
Update your main.jsx file to include the i18n config:
import { useState } from "react";
import reactLogo from "./assets/react.svg";
import viteLogo from "/vite.svg";
import "./App.css";
import { Route, BrowserRouter as Router, Routes } from "react-router-dom";
import Home from "./Pages/Home";
import About from "./Pages/About";
import Layout from "./Pages/Layout";
import "../src/in8"; //path for in8

function App() {
  const [count, setCount] = useState(0);

  return (
    <>
      <Router>
        <Routes>
          <Route path="/" element={<Layout />}>
            <Route index element={<Home />} />
            <Route path="/about" element={<About />} />
            <Route path="*" element={<div>404 Not Found</div>} />
          </Route>
        </Routes>
      </Router>
    </>
  );
}

export default App;
Step 6: Use Translations in Components
Inside Home.jsx or any component:
import React from "react";
import { useTranslation } from "react-i18next";

const Home = () => {
  const { t, i18n } = useTranslation();
  return (
    <div>
      <h1>{t("home.title")}</h1>
      <p>{t("home.description")}</p>
    </div>
  );
};

export default Home;
Now for About.jsx
import React, { use } from "react";
import { useTranslation } from "react-i18next";

const About = () => {
  const { t } = useTranslation();
  return (
    <>
      <div>
        <h1>{t("about.title")}</h1> <p>{t("about.description")}</p>
      </div>
    </>
  );
};

export default About;
src/Pages/Layout.jsx
import React, { use } from "react";
import { Outlet } from "react-router-dom";
import LanguageSwitcher from "../components/LanguageSwitcher";
import { useTranslation } from "react-i18next";

const navStyle = {
  display: "flex",
  gap: "1.5rem",
  background: "#222",
  padding: "1rem",
};

const linkStyle = {
  color: "#fff",
  textDecoration: "none",
  fontWeight: "bold",
  fontSize: "1.1rem",
};

const Layout = ({ children }) => {
  const { t } = useTranslation();
  return (
    <div>
      <header>
        <nav style={navStyle}>
          <a href="/" style={linkStyle}>
            {t("home.title")}
          </a>
          <a href="/about" style={linkStyle}>
            {t("about.title")}
          </a>
          <LanguageSwitcher />
        </nav>
      </header>
      <main>
        {children}

        <Outlet />
      </main>
    </div>
  );
};

export default Layout;
Step 7: Language Switcher src/components/LanguageSwitcher.jsx
import React from "react";
import { useTranslation } from "react-i18next";

const languages = [
  { code: "en", name: "English", native: "English", emoji: "🌍" },
  { code: "fr", name: "French", native: "Français", emoji: "🌎" },
  { code: "hi", name: "Hindi", native: "हिन्दी", emoji: "🌏" },
  { code: "de", name: "German", native: "Deutsch", emoji: "🌐" },
];

const LanguageSwitcher = ({ darkMode = false }) => {
  const { i18n } = useTranslation();

  const styles = {
    container: {
      display: "flex",
      alignItems: "center",
      gap: "0.5rem",
      background: darkMode ? "#222" : "#f5f5f5",
      color: darkMode ? "#f5f5f5" : "#222",
      padding: "0.75rem 1rem",
      borderRadius: "8px",
      boxShadow: darkMode
        ? "0 2px 8px rgba(0,0,0,0.35)"
        : "0 2px 8px rgba(0,0,0,0.07)",
    },
    select: {
      padding: "0.5rem",
      borderRadius: "6px",
      border: "1px solid #444",
      fontSize: "1rem",
      background: darkMode ? "#333" : "#fff",
      color: darkMode ? "#f5f5f5" : "#222",
    },
    icon: {
      fontSize: "1.5rem",
    },
  };

  return (
    <>
      <select
        onChange={(e) => i18n.changeLanguage(e.target.value)}
        value={i18n.language}
        style={styles.select}
      >
        {languages.map((lang) => (
          <option key={lang.code} value={lang.code}>
            {lang.emoji} {lang.native} ({lang.name})
          </option>
        ))}
      </select>
    </>
  );
};

export default LanguageSwitcher;
Step 8: start your application
npm run dev
Final Output
You are now a owner of a fully functional, multilingual React + Vite app utilizing a separate JSON locale files.
Try changing the language and then watch the UI text change in real-time!
Some Bonus Tips
You can use namespaces like {{lng}}/{{ns}}.json to modularize translating files.
You should store the user language choice of preference in localStorage or cookies.
You can use the useEffect hook to set the default language based on the logic in your app.
Conclusion
Internationalization is vital for creating apps that are globally accessible. Now that you have the power of react, vite, and i18next, you can integrate multiple languages into your apps quickly and cleanly.
If you have any questions or suggestions, leave a comment or check out the i18next documentation.
🔗 Bonus: Connect with Me
linkedin : https://www.linkedin.com/in/tarun-nayaka-r-28612a27a/
If you found this useful or faced any issue, feel free to reach out!
Happy Deploying! 🚀
🧑🏫 About the Authors
Tarun Nayaka – A Tech Enthusiast and Top Voice Awardee!
Tarun Nayaka, a passionate learner and recipient of the Top Voice accolade in Web Applications and Web Design, is on a journey of mastering technology one challenge at a time. With expertise ranging from web development to AI, Tarun is dedicated to sharing knowledge and empowering communities. Join him in exploring the vast possibilities of the tech world!
Related Articles


.png&w=3840&q=75)
Subscribe to My Newsletter
Stay updated with my latest articles, projects, and exclusive content.
By subscribing, you agree to our Privacy Policy. You can unsubscribe at any time.